Welcome
Welcome to the PFLlink API Developer Guide. This document will cover the features of the PFLlink API and describe how to build 3rd party integrations that enable Tactile Marketing Automation in your Application.
Getting Started
There are a number of actions that need to be taken to properly setup to use the PFLlink API through the PFL Portal. Follow the steps below to do so. You may also reach out to your PFL contact for help with this set-up.
- Create a developer account at PFLlink API Developer Portal
- Subscribe to the PFLlink API
- Create a PFLlink User
- Contact PFL to be associated with a PFL store (more details)
- Register your Application with PFL to obtain a Client Key and Client Secret
- Review the API Reference documents to understand the available endpoints and operations
- Authenticate to the API as a Service or PFL User
-
Create your integration
- Submit your integration for inclusion in our Applications Gallery
Resources
| Resource Name | Details |
|---|---|
| Postman REST Client | Postman is an application used throughout this documentation for sending sample REST requests to the PFLlink API. Get Postman at https://www.getpostman.com |
| Azure Active Directory OAuth 2.0 Authentication Guide | The PFLlink Identity Server uses Azure Active Directory. This guide explains how to initiate the various OAuth 2.0 grant flows. OAuth 2.0 in Azure AD |
Important Terms
| Term | Definition |
|---|---|
| PFLlink API | REST API for interacting with PrintingForLess.com stores. Methods exist to look up products, get estimates on delivery options and to submit fulfillment orders. |
| PFL User | A customer of PrintingForLess.com. They will have an account in the PFLlink Identity Service and be linked to one or more stores. Services may use an OAuth2 Authorization Token Grant flow to access the PFLlink API on their behalf |
| Store | A collection of printed or other physical fulfillment items. A store is tied to one or more PFL Users. |
| Developer | A person or team creating an integration using the PFLlink API. Developers are registered via the PFLLink API Developer Portal |
| Application | A custom integration created by a Developer and registered with PFLlink |
| Subscription | Authorization for a Developer to make calls against the PFLlink API. Limiting and analytics are tied to a Subscription Key, which the Developer must include in every call to the PFLlink API. |
| Subscription Key | Unique value that identifies a Developer’s subscription. This key does not provide any authentication to API resources on its own; requests must also include an OAuth2 token for resource authentication. |
| PFLlink Identity Server | Identity provider for PFLlink API’s, Portals and other future offerings. Generates OAuth2 tokens. |
API Identifiers
| Parameter Name | Definition |
|---|---|
| ApplicationID | This refers to either the internal or the external ID of the application. Although either can be used in API calls, use of the internal ID is encouraged. The internal ID is returned by Application GET (list) or POST functions. The external ID is also called the ClientID (see below) and is used specifically for authentication. |
| ClientID | This is the external ID of the application. It is used for authentication purposes. ClientID is generated in OAuth using the Application GET function. |
| KeyID | This is the unique identifier for an existing key, but not the actual value of the key. The actual value is referred to as the Client Secret and can only be accessed once on the initial CREATE. The KeyID is used to identify and regenerate keys. KeyID is generated in OAuth using the Application GET function. |
| OrderID | This refers to either the ID of the order or the OrderNumber. Either can be used to make API calls. OrderID and OrderNumber are always returned as the part of same payload, however, OrderNumber will be blank if the request has not yet been processed by the back-end systems. OrderID is returned as a GUID. Both are returned by Order GET (list or details) or POST functions. |
| ProductID | ID of a PFL product. This is needed to submit an order. ProductID is returned by Product GET (list) or POST functions. |
| RoleID | ID of a user role. RoleIDs are a subset of an application or store and represent an instance of the role being applied. This identifier is used to delete or apply a role. The RoleID format is int32. |
| StoreID | ID of the user’s PFL store. StoreID is returned by Store GET (list) or POST functions. |
| UserID | ID of the user. UserID is retured by User GET (list) or POST functions. |
Create A Developer Portal Account
In order to use the PFLlink API, you need to be a registered developer with PFL. Registration is free and takes only a few minutes. With a Developer Portal account, you will be able to:
- Subscribe to the PFLlink API
- View the API Reference documentation
- Submit your Application to the PFLlink Application Gallery
- Submit Issues and Bugs
Account Creation Steps
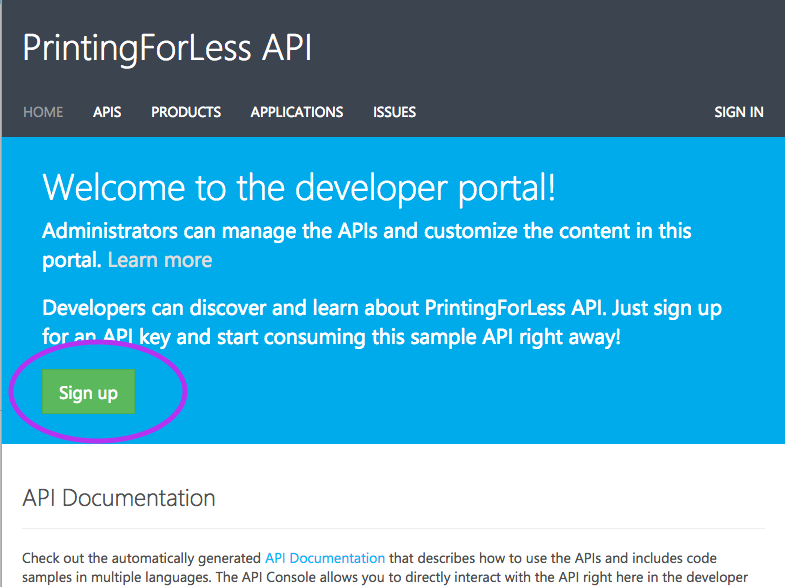
Visit the Developer Portal at https://portal.pflapi.com
-
Click the “Sign Up” button
-
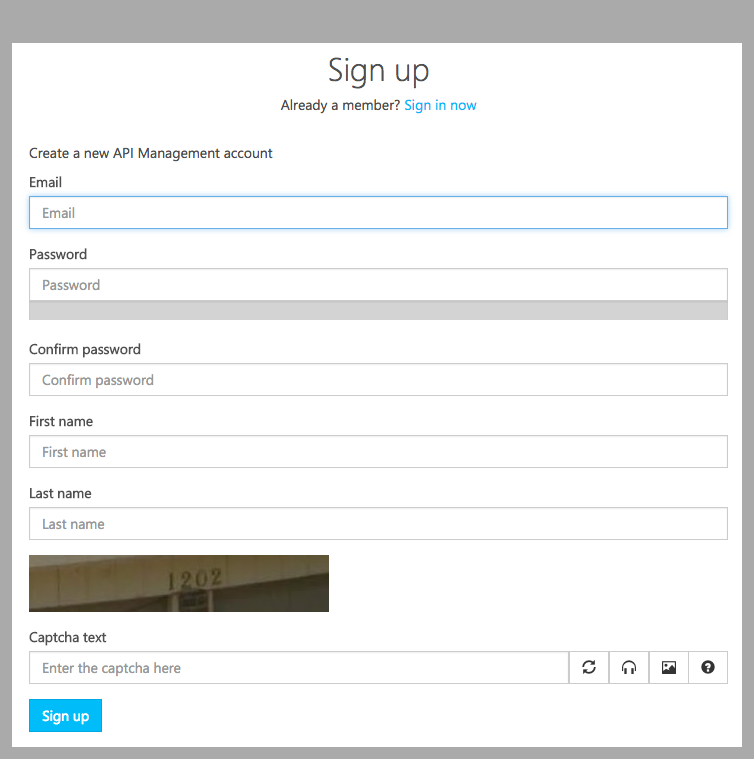
Enter your Email Address, Password, First Name, and Last Name into the registration form and hit “Sign Up”
-
A verification email will be sent to your email address.

Wait for the email to arrive and click the appropriate “Confirm” link.
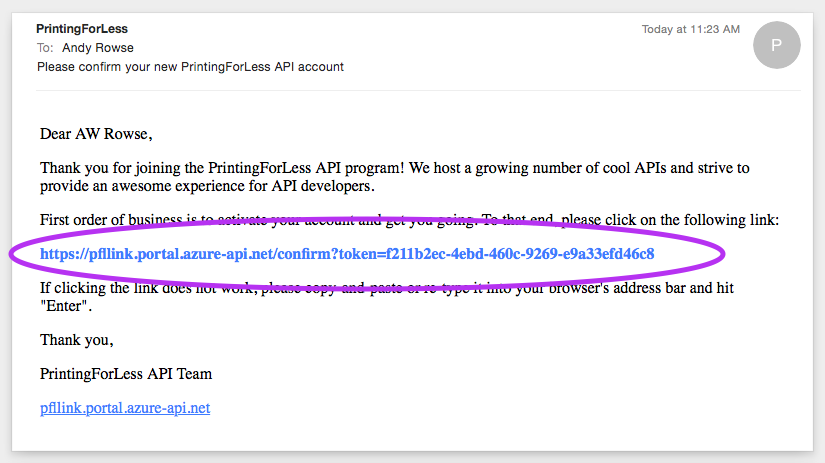
If the email doesn’t arrive, you can choose to resend it. Additionally, be sure to check your junk email folder. -
Congratulations; you now have an account. The system will take you to your developer profile page where you can manage your basic identity information, and any API subscriptions you’ve signed up for. Initially, this list will be blank; the next step is to get a subscription to one of the PFLlink API collections.
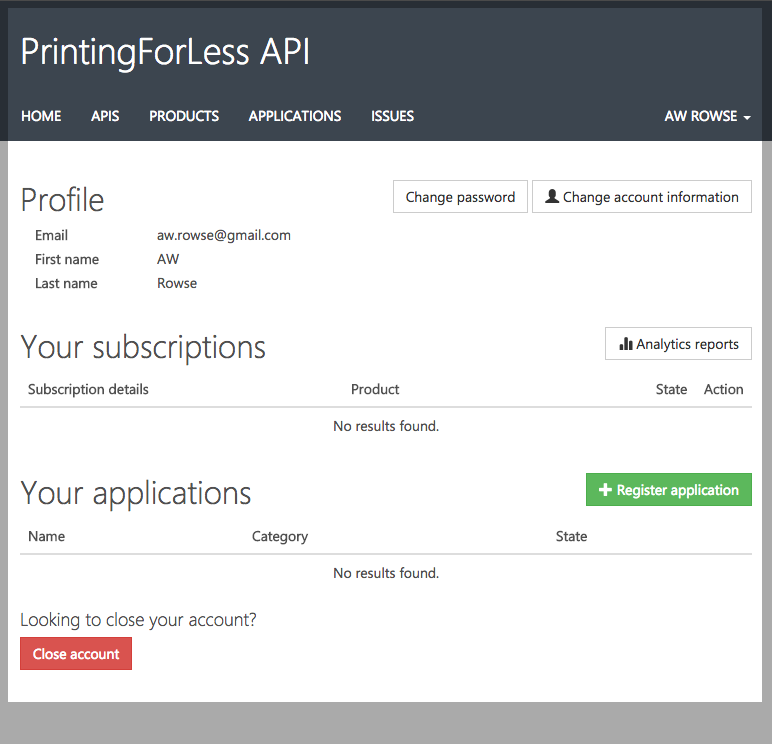
NOTE:
The Your applications list contained in the Profile page represents listings in the PFLlink API Application Gallery; these are Content-management system type listings and are not tied to any API behavior or permissions. These are not registered “Services” that have a Client Secret and Client Key and can make authenticated API calls.
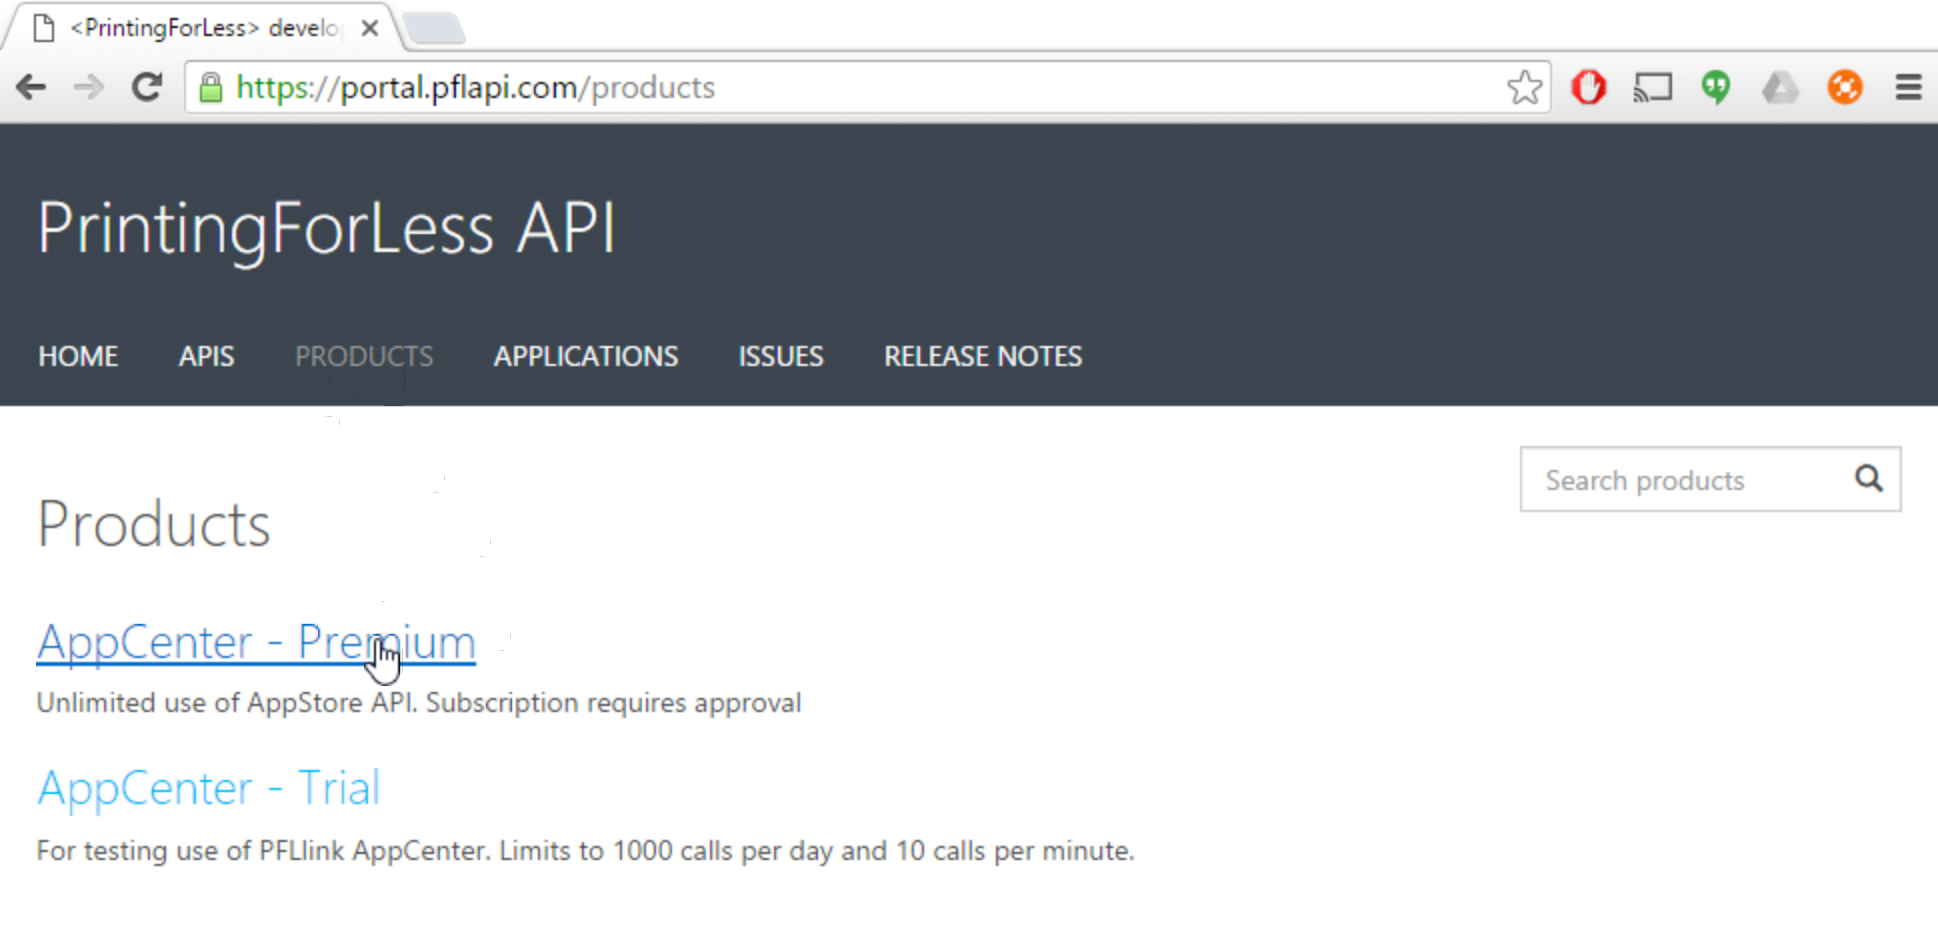
Subscribe To An API Collection
The PFLlink Developer Portal exposes multiple PFL API’s to third-party developers. These individual API’s are grouped into Products. Additionally, usage restrictions such as rate limits and quotas may be applied to a Product. (Elsewhere in the documentation, 'products' refers to the contents/collection of a store. Here it is a specific developer portal usage referring to an API collection.)
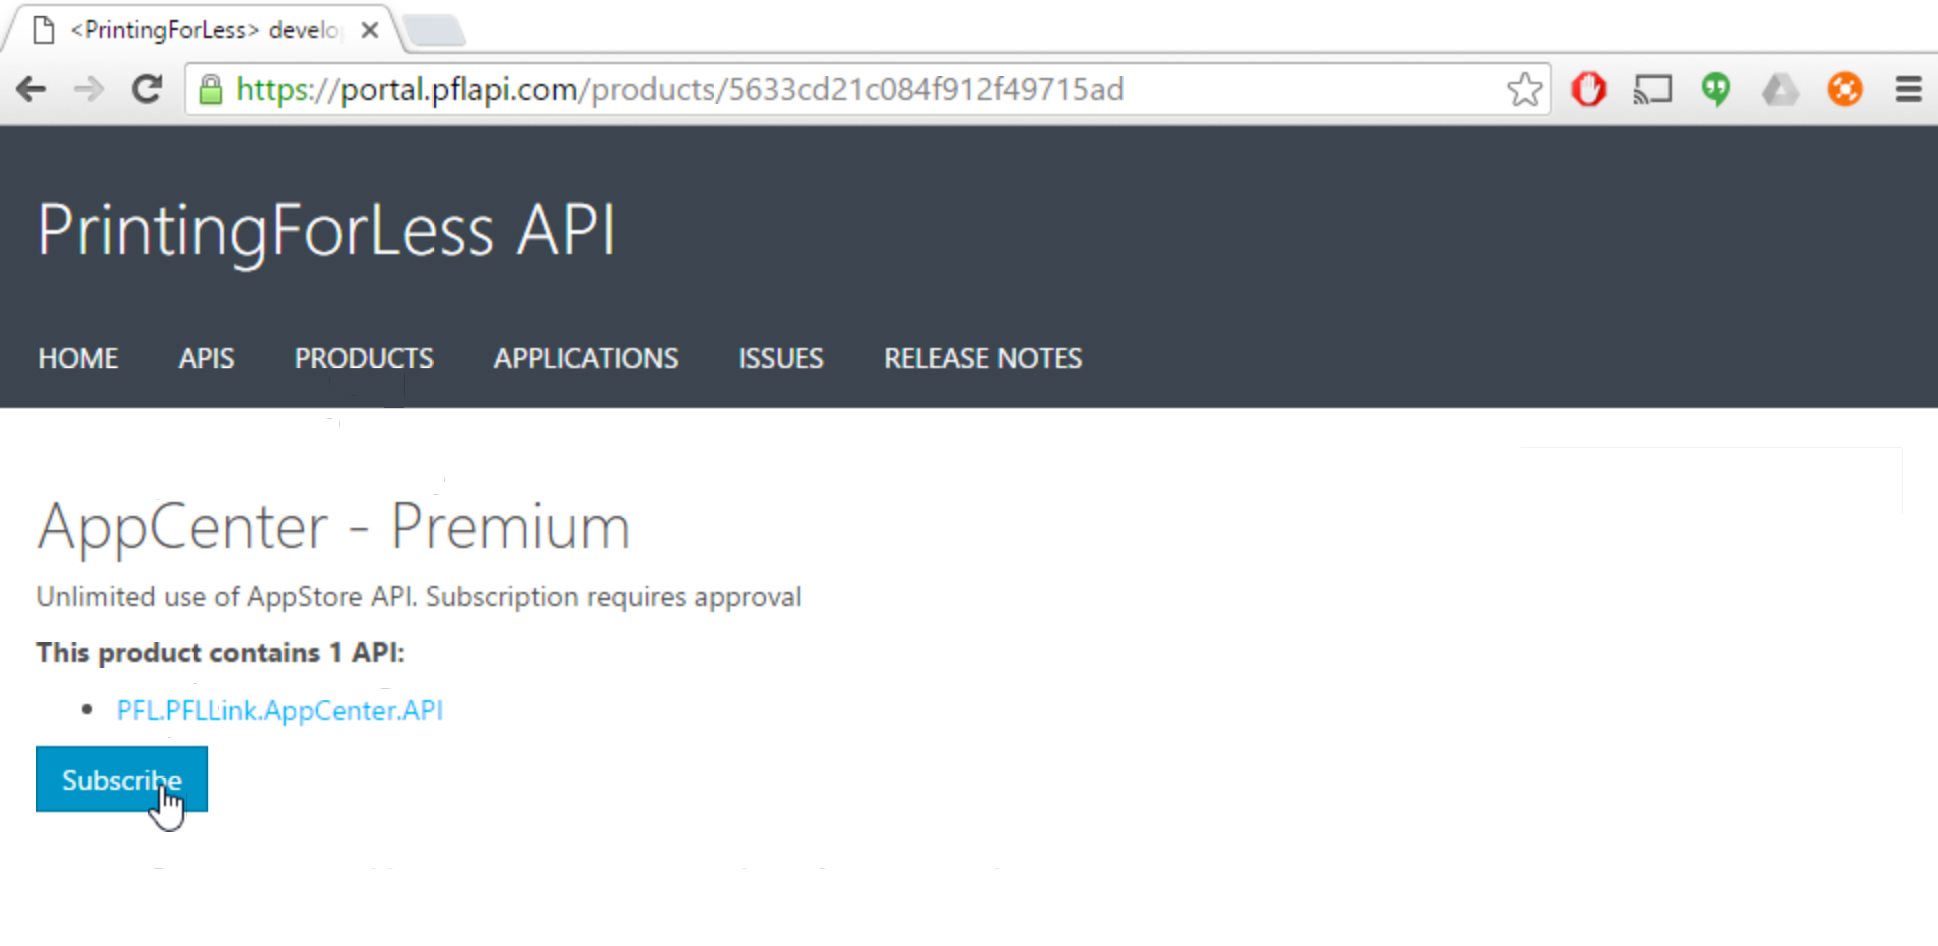
A Developer gains access to a Product by Subscribing to it. Some subscriptions are effective immediately while other require approval by a PrintingForLess.com administrator. (The required approval has been removed from the AppCenter - Premium product, which is the recommended API to subscribe to.) When a subscription is created, the Developer is given a pair of Subscription Keys. All requests to the PFLlink API’s must be accompanied by a valid Subscription Key or the request will be rejected with a HTTP 401 Access Denied response.
Note:
The Subscription Key does not provide any authentication to API resources on its own; requests must also include an OAuth2 token for resource authentication.
Subscribing to a Product
To subscribe to a product, you need to be logged in to the PrintingForLess Developer Portal at https://portal.pflapi.com.
Choose Product from the top navigation. (The direct link to the product page is https://portal.pflapi.com/products). From the products page, choose the product you would like to subscribe to and follow the remaining steps through :

Including the Subscription Key in API Requests
Each API request must include a Subscription Key. The key can be passed through any of the following methods:
-
As a URL GET parameter
Include a GET parameter with a key of “subscription-key” with a value equal to your subscription key. -
As a HTTP Header parameter
Include an HTTP Header named “Ocp-Apim-Subscription-Key” with a value equal to your subscription key.
Create a PFL User in the PFL Identity Server
The PFLlink Identity Server provides a centralized identity solution for all current and future PFLlink API and Portal functionality. Authentication Tokens (OAuth 2.0) are issued by this server. These tokens are required for accessing most PFLlink API resources.
Through their identity in the PFLLink Identity Server, a PFL User is associated to one or more PFLlink stores. Using the PFLlink API, the user can access these stores to view products, get quotes and submit orders.
3rd Party Applications are registered with the PFL Identity Server (see Register An Application) as authorized applications. Once registered, a 3rd Party Application can request OAuth tokens for PFL Users and then access API resources on their behalf.
For more information on OAuth 2.0 and the authentication process, see Authentication.
PFL User
A PFL User is a person who has access to one or more PFLlink stores. They exist as a record in the identity server and can be created through the PFLlink API. Additionally, they can be associated to PFLlink stores through the API.
Creating a PFL User
A PFLlink user is created by sending a POST request to the /user endpoint of the PFLlink API (see /user) (or by registering as a user of this portal).
As with all API calls, a Subscription Key is required. If you don’t have a Subscription Key, see Subscribe To An API Collection. This particular method does not require an OAuth Token.
To create a user send a POST request to the /user endpoint
Request:
POST /API/v1/user HTTP/1.1
Host: pflapi.com
Content-Type: application/json
ocp-apim-subscription-key: XXXXXXXXXXXXXXXXXXXXXXXXXXXXXXXX
Cache-Control: no-cache
Response:
#!json
{
        "Username": "string",
        "FirstName":"string",
        "LastName": "string",
        "Email": "string",
        "Password": "string",
        "Phone": "string"
}
NOTE:
When first created, a User is not associated to any stores. You must add them to a store before they will have access to any store resources.
Note on Username
The following restrictions apply to usernames:
- must not contain an @ symbol (ie. It can’t be an email address)
Get PFL User identity data from an OAuth Token
When calling the PFLlink API, it is important to know which user the access token applies to, and what stores they are associated with.
You can get user identity information by sending an HTTP GET request to the /user endpoint; the request should include the access token in the Authorization header as a bearer token.
Request:
GET /API/v1/user HTTP/1.1
Host: pflapi.com
Content-Type: application/json
ocp-apim-subscription-key: XXXXXXXXXXXXXXXXXXXXXXXXXXXXXXXX
Authorization: Bearer XXXX
Cache-Control: no-cache
Response:
#!json
{
        "ID": "XXXXXXXX-XXXX-XXXX-XXXX-XXXXXXXXXXXX",
        "Username": "XXXX",
        "UsernameWithDomain": "XXXX@pflportal.com",
        "FirstName": "Bruce",
        "LastName": "Wayne",
        "Email": "bruce@wayne.co",
        "Phone": " 444-555-5555"
}
Additionally, you can get information on the Roles/Permissions granted to the user for various stores by using the /user/roles endpoint.
Request:
GET /API/v1/user/roles HTTP/1.1
Host: pflapi.com
Content-Type: application/json
ocp-apim-subscription-key: XXXXXXXXXXXXXXXXXXXXXXXXXXXXXXXX
Authorization: Bearer XXXX
Cache-Control: no-cache
Response:
#!json
[
  {
        "ID": 21,
        "ApplicationID": null,
        "StoreID": "140158",
        "UserID": "9a0372d5-f464-4409-a816-58ff84f08e5d",
        "Grant": "order.self.write"
  }
]
Associating a PFL User to a store
A user has access to one or more PFL stores. In order to call an API operation against a store (GET Products, POST Order, GET Status), the user must be associated to that store. A PFL employee (typically the PFL Account Manager) will need to make the user to store association. The context of the user is tied to the OAuth token.
Through the API, a User can be associated to a store using the store’s Invite Key. The Invite Key is a shared secret key associated with a PFL store; it is provided to the PFL User by their PFL Account Manager.
The Invite Key will typically take the form of a GUID value. For example:
- 04792156-ff07-464e-9445-afc97d062c98
- 37931d58-d994-43a8-9bb3-d6e28079cff6
- c363f650-74b5-45db-98fe-464fbb2c7e15
An Invite Key can only be used once; the first use of the key will grant the User “admin” rights against the store. Subsequent users must be added by the “admin” User. This can be done either through the /store/{ID}/user endpoint (current), or through the PFLlink Portal (future).
To associate the user to a store, send an HTTP POST request with the user’s OAuth token and the Invite Key to the /store/invite endpoint. The token is sent in the Authorization header as a bearer token.
Request:
POST /API/v1/store/invite HTTP/1.1
Host: pflapi.com
Content-Type: application/json
ocp-apim-subscription-key: XXXXXXXXXXXXXXXXXXXXXXXXXXXXXXXX
Authorization: Bearer XXXX
Cache-Control: no-cache
{
  "InviteKey": "f48f0957-ac71-43b5-8155-beb4bd84f33a"
}
Response:
#!json
{
        "StoreID": "string",
        "BudgetEnabled": true,
        "BudgetTypes": [
    {
        "Value": "string",
        "Description": "string"
    }
  ],
        "BudgetDuration": [
    {
        "Value": "string",
        "Description": "string"
    }
  ],
        "CompanyName": "string"
}
Using the Demo Store
A Demo store is available for tesing purposes. The Demo store has limited permissions and a small selection of products.
To associate a User to the Demo store, use the /store/invite method (see above) with an Invite Key value of demo
Request:
POST /API/v1/store/invite HTTP/1.1
Host: pflapi.com
Content-Type: application/json
ocp-apim-subscription-key: XXXXXXXXXXXXXXXXXXXXXXXXXXXXXXXX
Authorization: Bearer XXXX
Cache-Control: no-cache
{
  "InviteKey": "demo"
}
Register An Application
An Application is a registered integration with PFL. When you register your Application you are provided with a Client Key and Client Secret; these values allow the service to generate authorization tokens that are used to authenticate with PFLlink API. All authentication is performed using an OAuth2 bearer token which is obtained from the PFLlink Identity Server.
An Application may authenticate to the PFLlink API either as itself (Client Credentials Flow), or on behalf of a PFLlink User (Authorization code grant, or Implicit Grant). In both situations, the authentication context is associated with one or more PrintingForLess.com stores. When the Service makes API calls, it will need to specify a store (by ID) through the REST resource URL. An endpoint exists that can return the stores associated with any given OAuth Access Token.
NOTE:
Application registration via the PFLlink API is not yet available. For now, a PFLlink API Admin will need to register an Application on your behalf.To request a new Application, send an email to apisupport@pfl.com
Authentication
The PFLlink API uses OAuth 2.0 bearer tokens to authenticate restricted API calls. The bearer token is created by the PFLlink Identity Server and contains a verifiable identity tied to either a registered Application or a PFL User. An Identity will have access to one or more resources in the PFLlink API; in simple terms, these resources are stores. A store is a collection of printed and physical fulfillment items that can be delivered to a person or business.
PFLlink Identity Server
Backing Technology
The PFLlink API uses Azure Active Directory technology for the Identity Server. Most user documentation or notes that pertain to Azure Active Directory will apply to interactions with the PFL Identity Server; this is especially helpful for understanding the various OAuth flows, the parameters expected in each step, and the responses returned by the server.
Additional Reading
Sending the OAuth token to the PFLlink APIs
When making API calls, the access token is sent as a Bearer token through the HTTP Authorization header.
Request:
GET /API/v1/user HTTP/1.1
Authorization: Bearer XXXXXXXXXXXXXXXXXXXXXXXXXXXXXXXXXXXXXXXXXXXXXXXXX
Specifying the Resource ID for the PFLlink API
When obtaining an OAuth token, the PFL Identity Server requires that the request explicitly specify that access is needed for the PFLlink API. This is done through passing a “resource” parameter in the request to the /authorize and /token endpoint with a value of https://pfl.pfllink.appportal.api.
IMPORTANT:
If the resource parameter is not included in the request to the /authorize AND /token endpoints, the OAuth token will not be able to access the PFLlink API.
Authenticating on Behalf of a PFL User
This section explains how to obtain an OAuth 2.0 Access Token using Authorization Code Grant flow.
For additional details, see https://msdn.microsoft.com/en-us/library/azure/dn645542.aspx
Use Case Notes
The Authorization Code grant flow is most appropriately used in a B2B type application where individual organizations (or sites, or accounts) of the application each have their own product store with PrintingForLess.com. The business relationship is between the individual application users and PrintingForLess.com and the application facilitates the communication between the two entities. The PFL Users are individually billed for their ordered items as configured in their individual PFL store.
The interactive flow is initiated by the Service during a hypothetical “Install” or “Configure” process; the service would acquire an Access Token and Refresh Token on behalf of a user and store them in a secure manner for later use. The tokens can then be used both during interactive operations, or for scheduled or non-interactive server-to-server type operations.
NOTE:
Remember that each Identity may be associated to one or more PFL stores. If you are creating an “Install” or “Configure” process as part of your integration, consider having the user select which store they would like to use. Alternatively, the user would select which store to use during the normal integration usage process.
Overview

- The client application starts the flow by redirecting the user agent to the Azure AD authorization endpoint. The user authenticates and consents, if consent is required.
- The Azure AD authorization endpoint redirects the user agent back to the client application with an authorization code. The user agent returns authorization code to the client application’s redirect URI.
- The client application requests an access token from the Azure AD token issuance endpoint. It presents the authorization code to prove that the user has consented.
- The Azure AD token issuance endpoint returns an access token and a refresh token. The refresh token can be used to request additional access tokens.
- The client application uses the access token to authenticate to the Web API.
- After authenticating the client application, the web API returns the requested data.
Authenticating as the Application (Client Credentials)
This section explains how to obtain an OAuth 2.0 Access Token for service to service calls using Client Credentials flow.
For additional details, see https://msdn.microsoft.com/en-us/library/azure/dn645543.aspx
Use Case Notes
The Client Credentials grant flow is most appropriately used in a B2C type application where application users have access to one (or few) PrintingForLess.com product stores which are owned by the developer of the application; the business relationship is between the application developer and PrintingForLess.com. The application’s users do not need to be PFL Users nor have their own stores; depending upon the implementation, they may not be aware they are interacting with PrintingForLess.com services. Instead the application developer makes her own store available to the application users and submits orders to PrintingForLess.com in a service-to-service context. The Application Developer is billed for any order items submitted by the application.
Client Credentials is a non-interactive flow appropriate for service-to-service communication. Tokens are generated using your Application’s Client ID and Client Key. While the Client ID is a quasi-public value, the Client Key should remain secure and protected. Most implementations will store these values in their application configurations and use them for all interactions with PFLlink API’s.
NOTE:
Remember that each Identity (including the Application itself) may be associated to one or more PFL stores.
Overview

- The client application authenticates to the Azure AD token issuance endpoint and requests an access token.
- The Azure AD token issuance endpoint issues the access token.
- The access token is used to authenticate to the secured resource.
- Data from the secured resource is returned to the web application.
* Request *
POST /pflportal.com/oauth2/token HTTP/1.1
Host: login.microsoftonline.com
Cache-Control: no-cache
Content-Type: application/x-www-form-urlencoded
grant_type=client_credentials
&client_id=XXXXXXXX-XXXX-XXXX-XXXX-XXXXXXXXXXXX
&client_secret=XXXXXXXXXXXXXX
&resource=https%3A%2F%2Fpfl.pfllink.appportal.api
* Result *
#!json
{
"token_type": "Bearer",
"expires_in": "3600",
"scope": "user_impersonation",
"expires_on": "1448941051",
"not_before": "1448937151",
"resource": "https://pfl.pfllink.appportal.api",
"access_token": "XXXXXXXXXXXXXXXXXXXXXXXXXXXXXXXXXXXXX"
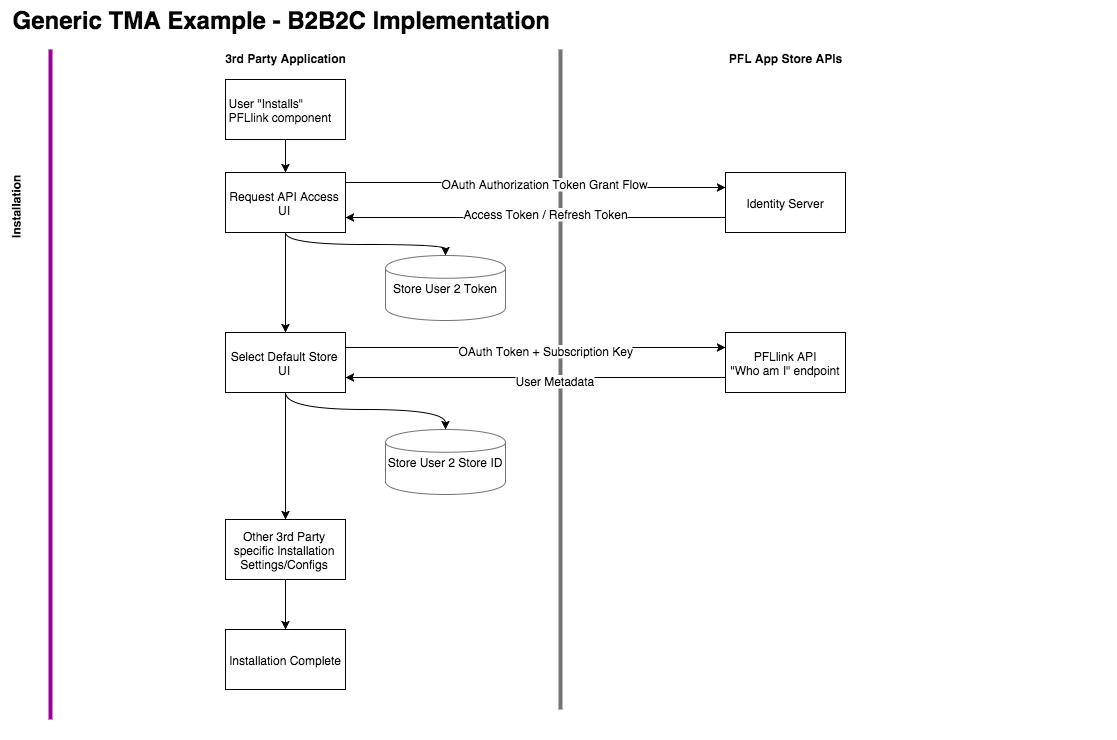
}Implementation Notes: B2B2C Automation
The following notes and diagrams are applicable for 3rd party implementations that follow a B2B2C pattern and send TMA products through automation. In a B2B2C scenario, your application is used by 1:N organizations, each of which have their own set of data and resources inside of your platform. These organizations in turn use your application to interact with their customers.
NOTE:
For use cases where an automation is not needed, see [B2B2C Transactional Implementation Guide](Guide B2B2C Transactional)
For example, your Application is a marketing automation platform
- Your customers are “Organizations” that want to send marketing to their end customers
- Each Organization maintains a list of “Contacts” within your platform
- Multiple Organizational Users can log into your platform and interact with Organization resources (Contacts & Contact lists)
- Your platform has a “Campaign” feature where a large scale 1:1 marketing automation can be created
- Through an integration with PFLlink API, you offer Organizations that have an account/store with PrintingForLess.com the ability to send physical items to their “Contacts” as a “Campaign Activity”
Implementation Overview Diagram: https://drive.google.com/file/d/0BxFFiFYgMeoBMG81MGFNUUpnb0k/view?usp=sharing
Installation
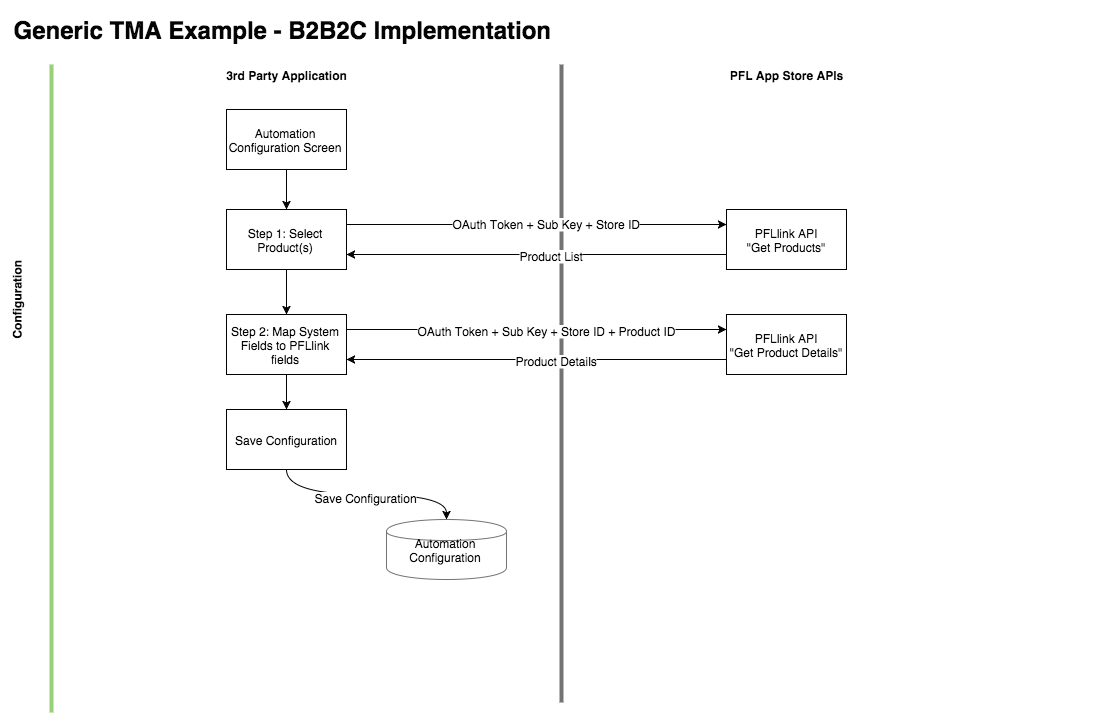
Configuration
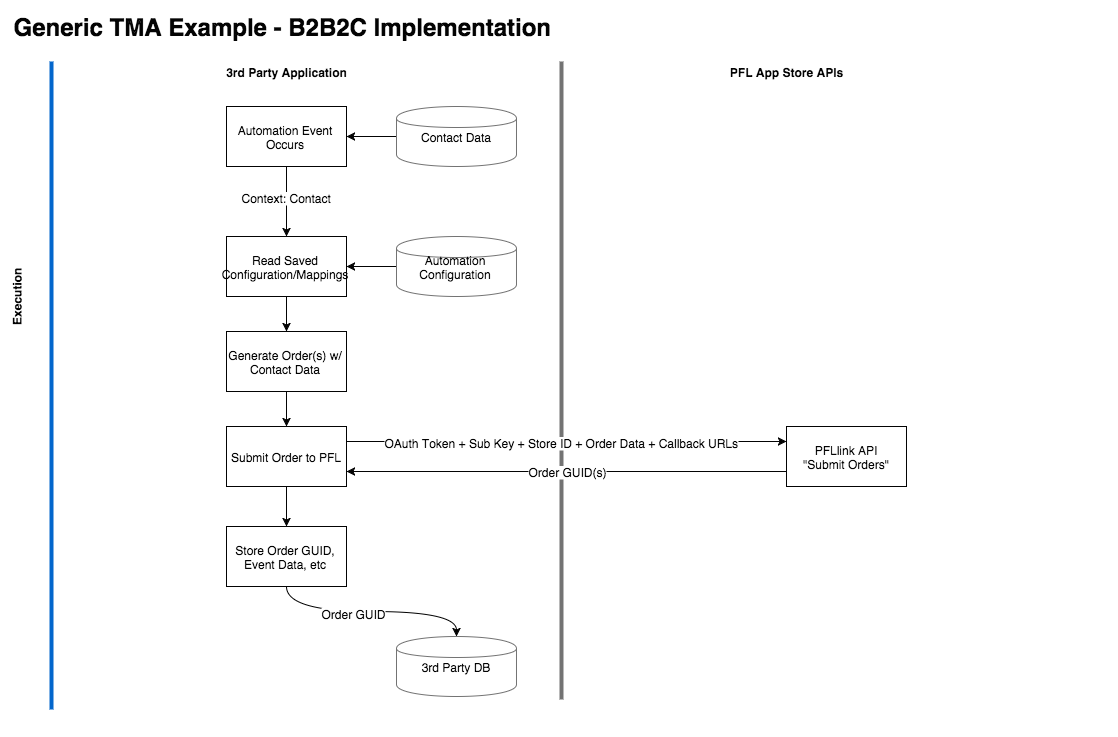
Execution
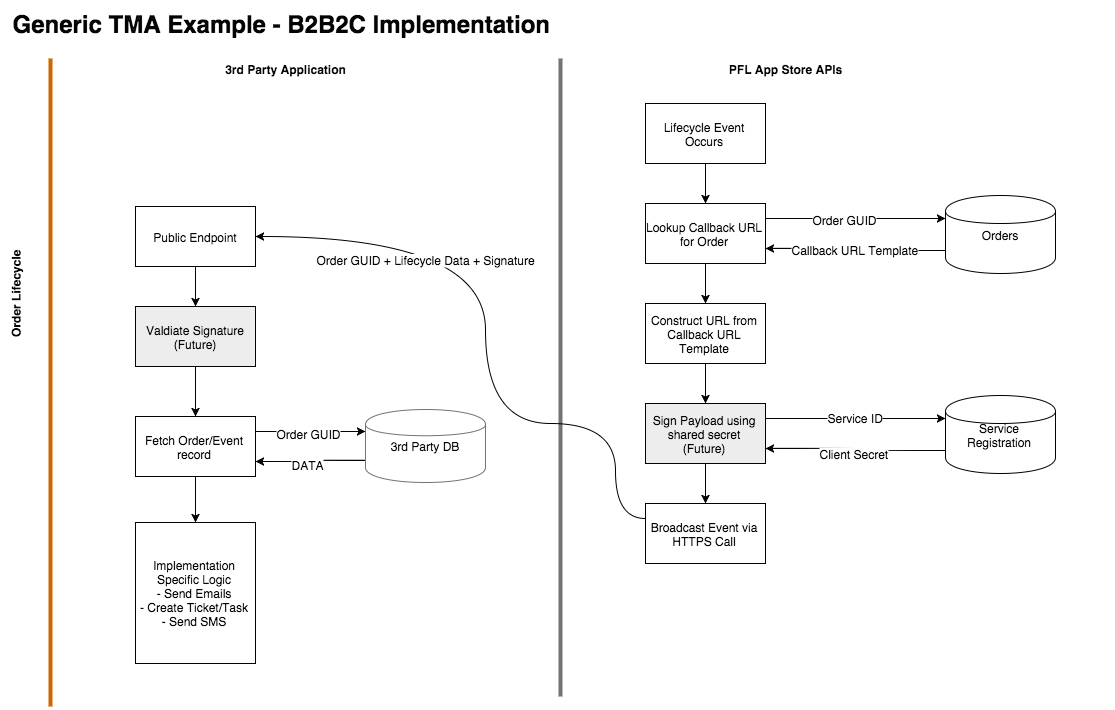
Order Life Cycle
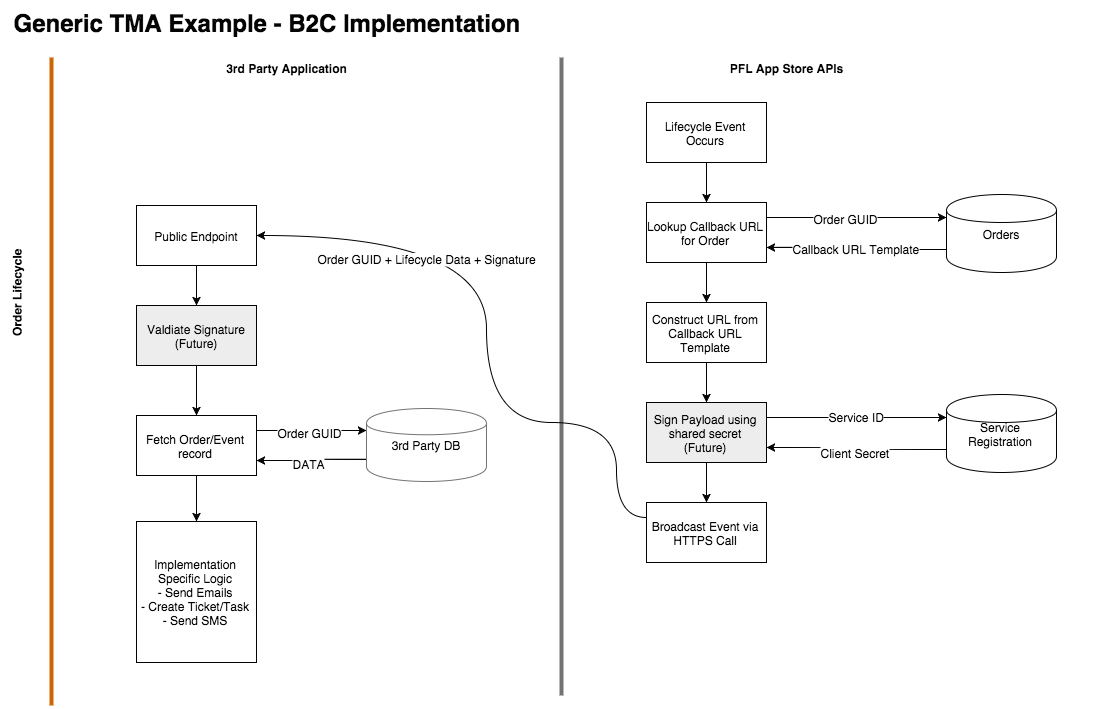
Implementation Notes: B2C
The following notes and diagrams are applicable for 3rd party implementations that follow a B2C pattern. In a B2C scenario, your application has the business relationship with PrintingForLess.com. Authentiation to the PFL API’s is performed as the “Application” itself through a client credential flow. The store(s) of available products are associated to the application for automated sending, or potentially made available to the users of the application.
For example, your Application is a microblogging service:
- When a new user creates an account, your application automatically sends a welcome letter and box of chocolates
- After the user creates 100 posts, your application sends a coffee mug and personalized postcard
- After a user refers 5 other users, the user is given a choice of gifts
Implementation Overview Diagram: https://drive.google.com/file/d/0BxFFiFYgMeoBTFdaT2xmOHdZZ1E/view?usp=sharing
Execution

Order Life Cycle